 © iRedDead & Simon 'Psy' Elliott 2008-2025. Powered by iGrandTheftAuto CMS v1.1 (Red Dead Edition April 2010). Privacy Policy
Ambient Challenges
There are 4 ambient challenges found in Red Dead Redemption. When you pause the game, navigate to the "Journal" section and in there you should see a listing called, "Challenges". These are required for 100% completion. This guide will help you in your quest to unlock the "Legend of the West" outfit, which is unlocked once you've completed all 10 levels of the 4 ambient challenges.
To unlock any of the following challenges, just start tackling the first level of any challenge. Once you begin, you'll be informed that you've unlocked the first level of the challenge. So lets get started...
NOTE: Each challenge level requires that you accomplish the goal at hand. There's no benefit to collecting flowers two challenge levels ahead because, when that challenge is unlocked, it always states to collect them "on top of the ones you've already collected". So for each level, you will be tasked with collecting exactly what they tell you to, regardless of how many you already have in your inventory.

This is probably the easiest challenge to complete because all your doing is just collecting flowers. You can purchase a "Survivalist Map" from any general store, which shows where the flowers are when riding around for 20 "actual" minutes. If you have all areas unlocked, it's possible you could have this challenge done in just an hour. Here's the levels and requirements for each.
These are found all around Cholla Springs and Hennigan's Stead.
These are found all around Gaptooth Ridge.
These are found all around Rio Bravo.
These are found all around Punta Orgulla.
These are found all around Perdido.
These are found all around Diez Coronas.
These are found all around Tall Trees.
These are found all around the Great Plains.
These are found all around the Great Plains.
The violet snowdrops are found in the northern part of Tall Trees. And for the "two of every plant", just follow the guides for each of the previous levels for their locations.

The following challenge will test your gun-slinging skills and your ability to use the dead-eye properly. I will provide tips to accomplishing these amazing feats. So lets get started.
This one is simple enough. Look to the sky and you'll more than likely see a bird immediately. Simply shoot 5 of them out of the air to complete level 1.
Slowly travel on horseback, keeping your eyes to the ground and around the bushes because, rabbits are small and kind of hard to see. They are the most abundant in Hennigan's Stead so, starting your search there is probably a good idea.
Sounds kind of hard but it's not. Simply stay on your horse because, coyotes are afraid of horses. If your on foot, there's a chance they may attack you. Shoot and kill 5 coyotes before one of them hits you and your done with level 3.
Wait at a train station, or jump on a moving train. It's up to you. Once you are on board and it's moving, simply climb to the top of the train and watch the skies for flying birds. Kill 5 of them and your done. If your not seeing any birds, shoot your gun off to try to scare them out of the trees.
The easiest solution to accomplish this one is head out to the brush and wait until a fuzzy little critter and a flying bird are both within your sights. Simply enable the dead-eye vision and kill both of them in a single use of the dead-eye. Or if your lucky, you might be able to catch a rabbit and a coyote. Either way, any two different animals work.
Very simple. Just aim and shoot the hat off of an enemy. Doing this with the dead-eye meter makes it a lot easier. But, it's also simple to just aim above the face of your enemy. Do this to 2 different enemies and your done.
Don't get confused, they are not asking you to kill 3 bears with one bullet. They are simply asking you to kill 3 bears, each one with only a single shot. The best way to accomplish this is to head to Tall Trees and use your most powerful rifle or repeater. Use the dead-eye targeting mechanic and paint a single mark right between the eyes of the bear. Do this three times and your done.
Follow the instructions I mentioned above for the hats. Now for the guns, simply do the same thing by using dead-eye but, target the enemies weapon instead, or their arm holding the weapon.
This is a lot easier than it sounds. Simply ride out into the wilderness and shoot 6 birds without reloading or changing weapons. I suggest using a weapon with a decent sized clip, and using dead-eye if your aim isn't that good.
This one is a little harder than the previous one but, the same rules apply. I found that going through the Gaptooth Ridge Gang Hideout is the easiest method. Once you've cleared the enemies outside the mine, head on into the tunnel. Reload your weapon and then proceed to move "slowly" through the mine, using dead-eye and targeting the weapons. Once you shoot the gun out of an enemies hand, shoot them in the head to prevent them from killing you. You may have to use some snake oil to refill your dead-eye meter since you will have to use this method on another 6 enemies. And i suggest once again to use a weapon with a large ammo clip to prevent you from needing to reload.

This challenge will test your hunting and survival skills in the wild. Use the following tips to outsmart the animals and cement your position on top of the food chain.
DuPz0r from the forums has been putting together a Hunting Hotspot guide for those who need help with locating animals. My locations work but, sometimes the animals just don't spawn. So, we've been filling up an interactive map of where other people have spotted animals. Visit the following link to go to the forum thread containing the information.
Hunting Hotspots
This one is pretty self-explanatory. Kill 5 coyotes and skin them for their pelts. Coyotes can be found everywhere so, you shouldn't have much of a problem. Just follow the barks, howls, and yelps you hear in the wild.
Just like the first level of this challenge, you need to kill and skin 5 of a certain species. In this case, it's the Deer. Just like the coyotes, these are found everywhere in the wild so, you shouldn't have much of a problem trying to find them. But be aware that Bucks do not count and they are usually seen alongside the deer. So ignore the Buck and go for the Doe.
These pesky little buggers are found throughout the land. They're easy to spot since they are usually chasing other animals and people. And if you stick around long enough, they'll come after you. Simply dismount your horse when near a pack and start slicing and dicing with your knife. There's not too much to worry about with the Wolves as they don't have a real strong attack but if your not careful, they can be deadly.
Armadillos are found in any desert-like setting. Basically everywhere except for Hennigan's Steed and the West Elizabeth territory. Kill and skin 3 of them.
Boars are a little more harder to find but, they do have spawn locations. They are found all over Tall Trees but, that's not always the best place to hunt them since Bears and Cougars are always there as well. Stillwater Creek, east of Macfarlane's Ranch, is another place they tend to spawn. As well as north of the Ranch. This is probably the safest place to hunt them, and it's also a place to hunt them if you haven't unlocked West Elizabeth yet. Kill and skin 5 of them and your done.
I personally found this to be the hardest challenge because, it seems like when you open up this challenge, Cougars become a rare spawn. They are found literally everywhere on the map but, the best spawn locations are usually the Great Plains and in the southern portion of Nuevo Paraiso. The problem with Cougars is by the time you see one, it's usually too late. So, when hunting cougars you have to be on high alert or you'll keep missing your chance at this challenge. As suggested by ViceMan on the forums, it's probably best to shoot the Cougar in the legs to slow them down and keep them from charging towards you. Once you cripple the Cougar, approach it and kill it with your knife. Skin it and then repeat the process one more time. The good thing about Cougars though is, they travel in pairs so, if you kill one, the other isn't too far away. That can be a good thing or a bad thing, depending on the situation.
15 pelts in one challenge. That's the only difficult part because, these animals are in abundance out there in the wilderness. Raccoons and Skunks are found all over Hennigan's Steed. Foxes can be found in the southern section of Cholla Springs, or in the southern section of the Great Plains. Kill and skin 5 of each and your done.
Head on out to Tall Trees with your horse and start searching up and down the county. These are found all over the area. I suggest being on your horse for two reasons. 1) There's some dangerous animals out here and at least if they attack, they get your horse before they get you, and 2) Both of these animals are fairly quick on their feet and you may have to give chase at times. Simply stay on the lookout and you'll eventually see them. Elk are found more in the northern part of Tall Trees while the Bighorns are found more in the southern section of the area. Skin 5 of each to finish this level.
Head out to Tall Trees and it wont take long before you see a Bear, if he hasn't seen you first. Simply put a couple of bullets into him before he reaches you, then whip out your knife and finish him off. Be careful though, Bears are the strongest animal in the game and could very quickly take you out. Also, be on the lookout for other Bears nearby who might try to spoil the fun.
Pretty self-explanatory and actually quite easy to accomplish. Simply travel to Ojo Del Diablo and start riding around the area. Eventually, a message pops up saying you've found the legendary character. He then appears on your map as a red dot. Simply pull out your best weapon and while using dead-eye, paint as many targets as you can on it's head. These legendary characters have a little more health than your normal animal so, it's going to take a few more well placed shots to take them down. Once you kill him, skin him and your done.
Pretty much follow the steps indicated for level 9 of this challenge. Only replace the locations with the ones listed above. These animals are easy to find but, they will take a few more bullets to bring down so be prepared.

This challenge is a lot of fun. You get your first map by either saving a treasure hunter or looting it off his dead body. The map spawns as a random ambient distraction out in the world of Red Dead Redemption. Once you either help the hunter or help yourself, you'll open up the Treasure Hunter Challenge. In your inventory will be a map. Open it up and follow the very cryptic drawing to find the treasure. I will provide you with the locations and a brief description of where to look. But I strongly suggest that if you need to use my guide, use it for just the locations, not for the brief description because, finding the treasure yourself is very rewarding.
Each treasure that you find contains a Gold Bar and another map that leads to a different treasure location. Find the 9 treasures and you'll become a master treasure hunter. Yes, there's only nine levels because, finding the first map is considered to be the first level.
NOTE: You cannot jump ahead on the list and collect treasure #4 if your still on the second one because, the treasure will not spawn until your in possession of the map.
MAP PICTURE
Search behind the big tall rocks by the tree and you'll come across a pile of little rocks. Remember this little rock formation because, all treasures will be underneath it.
MAP PICTURE
Travel to the end of the road that takes you across the top of the rock formation. You should see a campsite up here. Open up your map and look for the path it tells you to take. Carefully maneuver yourself down the path to the right at first, then to the left and you'll eventually come across a cliff edge to walk on. If you've reached the beach, you've gone to far. The treasure will be hidden underneath a familiar rock formation.
MAP PICTURE
Go into the basement of the big mansion that sits atop the hill. Down there you will see a cow skull. The treasure is underneath it.
MAP PICTURE
Look for the big tree with cattle skulls all around it. Follow the very simply directions from the map to a location just behind a short wall. The treasure is there.
MAP PICTURE
Climb the big rock formation you see in the map sketch. It's easy to determine which one it is because, the correct one has a treasure chest underneath it, not related to the treasure hunt.
MAP PICTURE
This one is pretty easy as you'll see the familiar rock formation from the map miles and miles away. Simply climb up to the spot and it's hard to miss.
MAP PICTURE
You'll have to approach this one from the south because, this rock formation sits atop one of the tallest formations in Mexico and offers a really nice view. Approach from the West of Casa Madrugada, climbing up the hill and going pass Agave Viejo to the north. Once you spot the rock from the illustration on the map, follow the path from the map. You'll walk along a cliff facing the water until you reach the end. The treasure is at the end of the walk.
MAP PICTURE
Head to a little place on the map called, Broken Tree, just East of Beecher's Hope. The treasure is located alongside a broken down wall. You can't miss it.
MAP PICTURE
A very simple treasure location finishes out the list. Ride up the winding path in Nekoti Rock and you'll see a cave at the end of the road. Enter the cave and you'll spot the treasure inside. Open it up to complete the Treasure Hunting Challenge.
Congratulations! If you completed everything on this list, your one step closer to 100% completion. And if you finished this list then you also unlocked the "Legend of the West Outfit", which doubles the capacity of the dead-eye meter! So, give yourself a pat on the back!
To unlock any of the following challenges, just start tackling the first level of any challenge. Once you begin, you'll be informed that you've unlocked the first level of the challenge. So lets get started...
NOTE: Each challenge level requires that you accomplish the goal at hand. There's no benefit to collecting flowers two challenge levels ahead because, when that challenge is unlocked, it always states to collect them "on top of the ones you've already collected". So for each level, you will be tasked with collecting exactly what they tell you to, regardless of how many you already have in your inventory.
Survivalist Challenge
This is probably the easiest challenge to complete because all your doing is just collecting flowers. You can purchase a "Survivalist Map" from any general store, which shows where the flowers are when riding around for 20 "actual" minutes. If you have all areas unlocked, it's possible you could have this challenge done in just an hour. Here's the levels and requirements for each.
LEVEL 1
Collect 6 Wild FeverfewThese are found all around Cholla Springs and Hennigan's Stead.
LEVEL 2
Collect 6 Desert SagesThese are found all around Gaptooth Ridge.
LEVEL 3
Collect 4 Red SagesThese are found all around Rio Bravo.
LEVEL 4
Collect 8 Prickly PearsThese are found all around Punta Orgulla.
LEVEL 5
Collect 7 Woolly Blue CurlsThese are found all around Perdido.
- Once you finish level 5, you unlock a minor perk to aid in your travels. In this case, you unlock the ability for the "Survivalist Map" to last for 40 minutes instead of 20. So, it's possible to knock out a few challenges before the time expires on the map.
LEVEL 6
Collect 8 Butterfly WeedsThese are found all around Diez Coronas.
LEVEL 7
Collect 10 Hummingbird SagesThese are found all around Tall Trees.
LEVEL 8
Collect 12 Prairie PoppiesThese are found all around the Great Plains.
LEVEL 9
Collect 15 Golden CurrentsThese are found all around the Great Plains.
LEVEL 10
Collect 10 Violet Snowdrops and collect two of every plant above.The violet snowdrops are found in the northern part of Tall Trees. And for the "two of every plant", just follow the guides for each of the previous levels for their locations.
- After finishing level 10, you unlock the ability to brew your own "Tonic", which restores your dead-eye. By collecting plants, John automatically makes the tonic and it can be found in your inventory.
Sharpshooter Challenge
The following challenge will test your gun-slinging skills and your ability to use the dead-eye properly. I will provide tips to accomplishing these amazing feats. So lets get started.
LEVEL 1
Kill 5 Flying BirdsThis one is simple enough. Look to the sky and you'll more than likely see a bird immediately. Simply shoot 5 of them out of the air to complete level 1.
LEVEL 2
Kill 5 RabbitsSlowly travel on horseback, keeping your eyes to the ground and around the bushes because, rabbits are small and kind of hard to see. They are the most abundant in Hennigan's Stead so, starting your search there is probably a good idea.
LEVEL 3
Kill 5 Coyotes before taking any damageSounds kind of hard but it's not. Simply stay on your horse because, coyotes are afraid of horses. If your on foot, there's a chance they may attack you. Shoot and kill 5 coyotes before one of them hits you and your done with level 3.
LEVEL 4
Kill 5 Flying Birds from a moving trainWait at a train station, or jump on a moving train. It's up to you. Once you are on board and it's moving, simply climb to the top of the train and watch the skies for flying birds. Kill 5 of them and your done. If your not seeing any birds, shoot your gun off to try to scare them out of the trees.
LEVEL 5
Kill two different animals in a single dead-eye useThe easiest solution to accomplish this one is head out to the brush and wait until a fuzzy little critter and a flying bird are both within your sights. Simply enable the dead-eye vision and kill both of them in a single use of the dead-eye. Or if your lucky, you might be able to catch a rabbit and a coyote. Either way, any two different animals work.
- After finishing level 5, you will unlock the ability to receive more ammo from your chest at your safehouse, and more ammo when staying at your campsite.
LEVEL 6
Shoot the hats off of two different peopleVery simple. Just aim and shoot the hat off of an enemy. Doing this with the dead-eye meter makes it a lot easier. But, it's also simple to just aim above the face of your enemy. Do this to 2 different enemies and your done.
LEVEL 7
Kill 3 Bears each with a single shotDon't get confused, they are not asking you to kill 3 bears with one bullet. They are simply asking you to kill 3 bears, each one with only a single shot. The best way to accomplish this is to head to Tall Trees and use your most powerful rifle or repeater. Use the dead-eye targeting mechanic and paint a single mark right between the eyes of the bear. Do this three times and your done.
LEVEL 8
Shoot the hats off of two different people, and disarm two different peopleFollow the instructions I mentioned above for the hats. Now for the guns, simply do the same thing by using dead-eye but, target the enemies weapon instead, or their arm holding the weapon.
LEVEL 9
Kill any 6 Wild Animals without reloading or changing weaponsThis is a lot easier than it sounds. Simply ride out into the wilderness and shoot 6 birds without reloading or changing weapons. I suggest using a weapon with a decent sized clip, and using dead-eye if your aim isn't that good.
LEVEL 10
Disarm any 6 enemies without reloading or changing weaponsThis one is a little harder than the previous one but, the same rules apply. I found that going through the Gaptooth Ridge Gang Hideout is the easiest method. Once you've cleared the enemies outside the mine, head on into the tunnel. Reload your weapon and then proceed to move "slowly" through the mine, using dead-eye and targeting the weapons. Once you shoot the gun out of an enemies hand, shoot them in the head to prevent them from killing you. You may have to use some snake oil to refill your dead-eye meter since you will have to use this method on another 6 enemies. And i suggest once again to use a weapon with a large ammo clip to prevent you from needing to reload.
- After you finish the 10 levels of the Sharpshooter Challenge, you'll unlock the ability to refill your dead-eye meter quicker by killing enemies.
Master Hunter Challenge
This challenge will test your hunting and survival skills in the wild. Use the following tips to outsmart the animals and cement your position on top of the food chain.
DuPz0r from the forums has been putting together a Hunting Hotspot guide for those who need help with locating animals. My locations work but, sometimes the animals just don't spawn. So, we've been filling up an interactive map of where other people have spotted animals. Visit the following link to go to the forum thread containing the information.
Hunting Hotspots
LEVEL 1
Collect 5 Coyote PeltsThis one is pretty self-explanatory. Kill 5 coyotes and skin them for their pelts. Coyotes can be found everywhere so, you shouldn't have much of a problem. Just follow the barks, howls, and yelps you hear in the wild.
LEVEL 2
Collect 5 Deer PeltsJust like the first level of this challenge, you need to kill and skin 5 of a certain species. In this case, it's the Deer. Just like the coyotes, these are found everywhere in the wild so, you shouldn't have much of a problem trying to find them. But be aware that Bucks do not count and they are usually seen alongside the deer. So ignore the Buck and go for the Doe.
LEVEL 3
Kill 5 Wolves with your knife and collect 5 Wolf PeltsThese pesky little buggers are found throughout the land. They're easy to spot since they are usually chasing other animals and people. And if you stick around long enough, they'll come after you. Simply dismount your horse when near a pack and start slicing and dicing with your knife. There's not too much to worry about with the Wolves as they don't have a real strong attack but if your not careful, they can be deadly.
LEVEL 4
Collect 5 Boar Tusks and 3 Armadillo CarapacesArmadillos are found in any desert-like setting. Basically everywhere except for Hennigan's Steed and the West Elizabeth territory. Kill and skin 3 of them.
Boars are a little more harder to find but, they do have spawn locations. They are found all over Tall Trees but, that's not always the best place to hunt them since Bears and Cougars are always there as well. Stillwater Creek, east of Macfarlane's Ranch, is another place they tend to spawn. As well as north of the Ranch. This is probably the safest place to hunt them, and it's also a place to hunt them if you haven't unlocked West Elizabeth yet. Kill and skin 5 of them and your done.
LEVEL 5
Kill 2 Cougars with a knife and collect 2 Cougar PeltsI personally found this to be the hardest challenge because, it seems like when you open up this challenge, Cougars become a rare spawn. They are found literally everywhere on the map but, the best spawn locations are usually the Great Plains and in the southern portion of Nuevo Paraiso. The problem with Cougars is by the time you see one, it's usually too late. So, when hunting cougars you have to be on high alert or you'll keep missing your chance at this challenge. As suggested by ViceMan on the forums, it's probably best to shoot the Cougar in the legs to slow them down and keep them from charging towards you. Once you cripple the Cougar, approach it and kill it with your knife. Skin it and then repeat the process one more time. The good thing about Cougars though is, they travel in pairs so, if you kill one, the other isn't too far away. That can be a good thing or a bad thing, depending on the situation.
- After you finish the 5th level in this challenge, you'll unlock the Buffalo Rifle. A single shot rifle with good accuracy and damage. Once unlocked, you can find it at most Gunsmiths throughout the land for a decent price.
LEVEL 6
Collect 5 Fox Pelts, 5 Skunk Pelts, and 5 Raccoon Pelts15 pelts in one challenge. That's the only difficult part because, these animals are in abundance out there in the wilderness. Raccoons and Skunks are found all over Hennigan's Steed. Foxes can be found in the southern section of Cholla Springs, or in the southern section of the Great Plains. Kill and skin 5 of each and your done.
LEVEL 7
Collect 5 Elk Meat and 5 Bighorn SkinsHead on out to Tall Trees with your horse and start searching up and down the county. These are found all over the area. I suggest being on your horse for two reasons. 1) There's some dangerous animals out here and at least if they attack, they get your horse before they get you, and 2) Both of these animals are fairly quick on their feet and you may have to give chase at times. Simply stay on the lookout and you'll eventually see them. Elk are found more in the northern part of Tall Trees while the Bighorns are found more in the southern section of the area. Skin 5 of each to finish this level.
LEVEL 8
Kill and skin a Bear with your KnifeHead out to Tall Trees and it wont take long before you see a Bear, if he hasn't seen you first. Simply put a couple of bullets into him before he reaches you, then whip out your knife and finish him off. Be careful though, Bears are the strongest animal in the game and could very quickly take you out. Also, be on the lookout for other Bears nearby who might try to spoil the fun.
LEVEL 9
Search Ojo Del Diablo for "Khan" the legendary Jaguar and collect his pelt.Pretty self-explanatory and actually quite easy to accomplish. Simply travel to Ojo Del Diablo and start riding around the area. Eventually, a message pops up saying you've found the legendary character. He then appears on your map as a red dot. Simply pull out your best weapon and while using dead-eye, paint as many targets as you can on it's head. These legendary characters have a little more health than your normal animal so, it's going to take a few more well placed shots to take them down. Once you kill him, skin him and your done.
LEVEL 10
Search Aurora Basin, Stillwater Creek, and Nekoti Rock for "Lobo" the legendary wolf, "Gordo" the legendary Boar and "Brumas" the legendary Bear and collect their pelts.Pretty much follow the steps indicated for level 9 of this challenge. Only replace the locations with the ones listed above. These animals are easy to find but, they will take a few more bullets to bring down so be prepared.
- Once you've finished all 10 levels of this challenge, you'll unlock the ability to create "Vittles" when you skin an animal. Vittles can restore your health, just like medicine.
Treasure Hunter Challenge
This challenge is a lot of fun. You get your first map by either saving a treasure hunter or looting it off his dead body. The map spawns as a random ambient distraction out in the world of Red Dead Redemption. Once you either help the hunter or help yourself, you'll open up the Treasure Hunter Challenge. In your inventory will be a map. Open it up and follow the very cryptic drawing to find the treasure. I will provide you with the locations and a brief description of where to look. But I strongly suggest that if you need to use my guide, use it for just the locations, not for the brief description because, finding the treasure yourself is very rewarding.
Each treasure that you find contains a Gold Bar and another map that leads to a different treasure location. Find the 9 treasures and you'll become a master treasure hunter. Yes, there's only nine levels because, finding the first map is considered to be the first level.
NOTE: You cannot jump ahead on the list and collect treasure #4 if your still on the second one because, the treasure will not spawn until your in possession of the map.
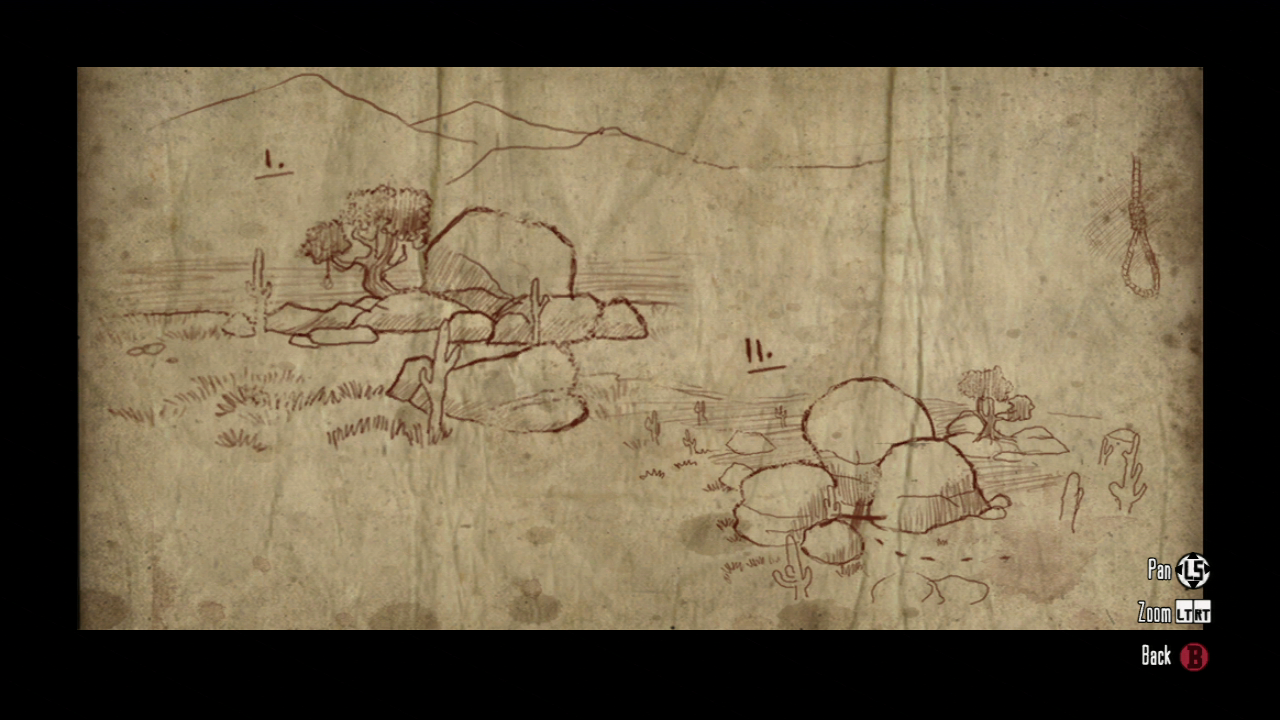
LEVEL 2
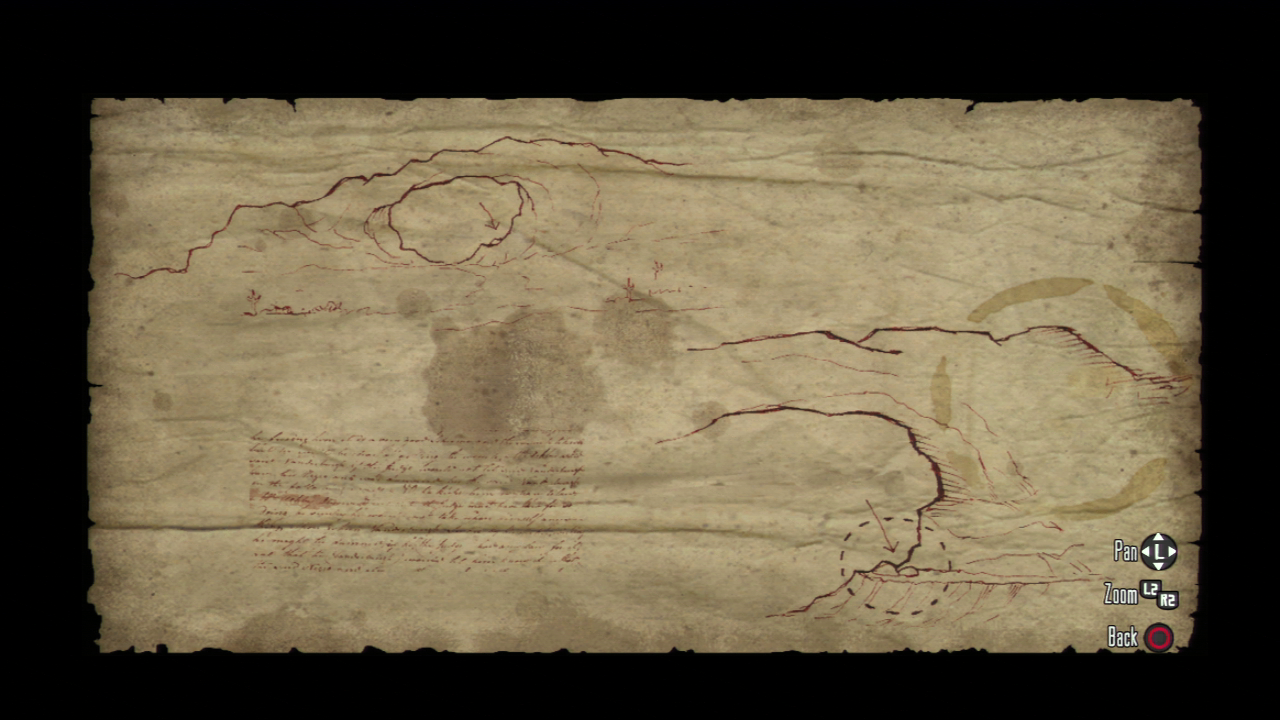
The first treasure is found by Hanging RockMAP PICTURE
Search behind the big tall rocks by the tree and you'll come across a pile of little rocks. Remember this little rock formation because, all treasures will be underneath it.
LEVEL 3
The second treasure is found by Del Lobo RockMAP PICTURE
Travel to the end of the road that takes you across the top of the rock formation. You should see a campsite up here. Open up your map and look for the path it tells you to take. Carefully maneuver yourself down the path to the right at first, then to the left and you'll eventually come across a cliff edge to walk on. If you've reached the beach, you've gone to far. The treasure will be hidden underneath a familiar rock formation.
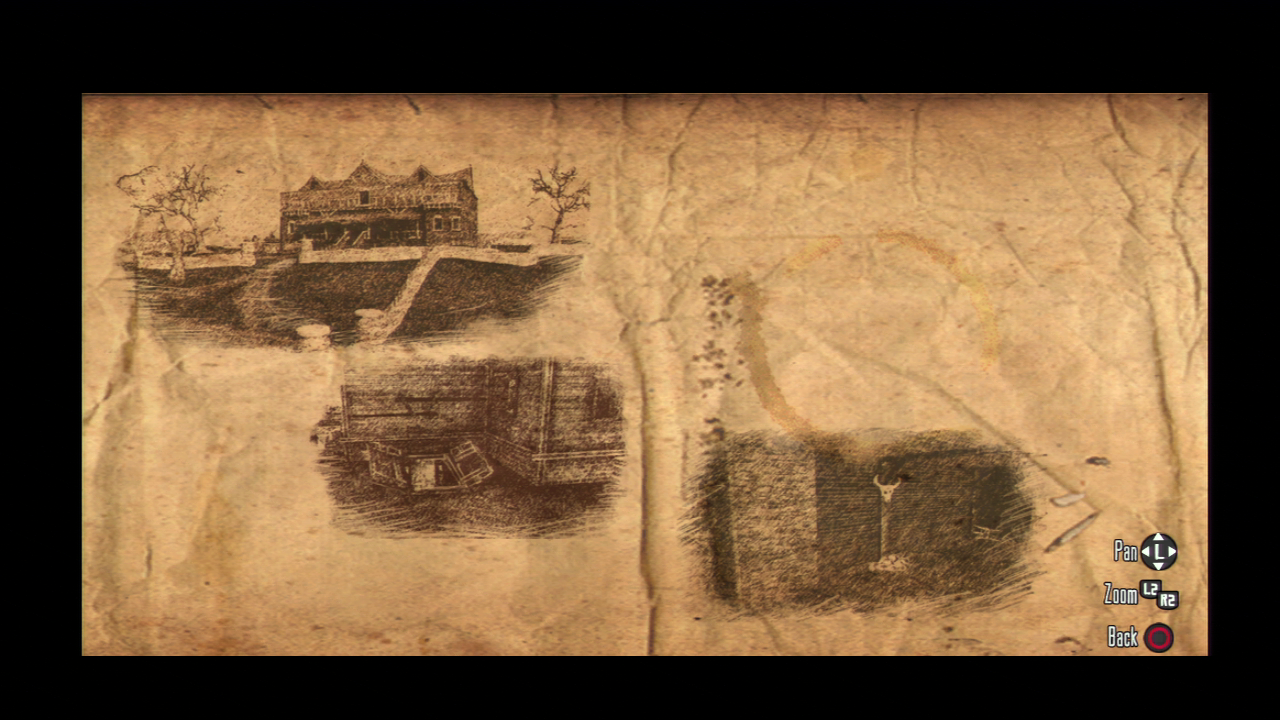
LEVEL 4
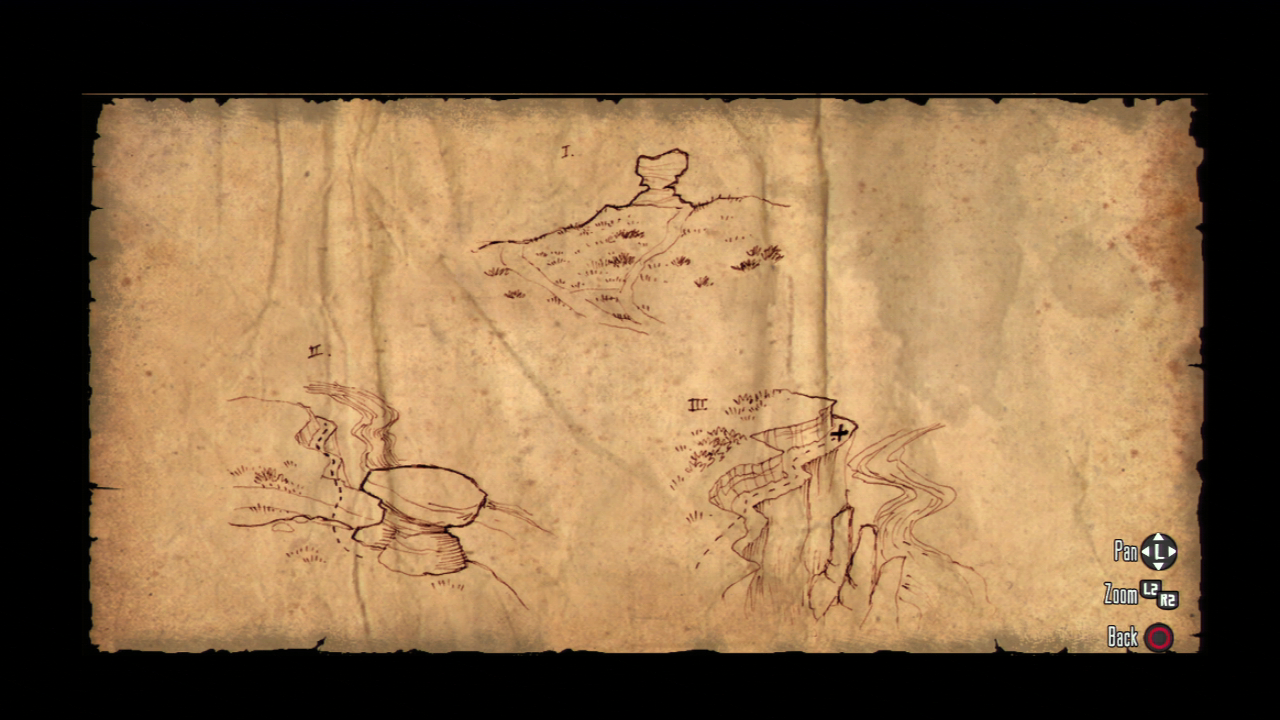
The third treasure is found in TumbleweedMAP PICTURE
Go into the basement of the big mansion that sits atop the hill. Down there you will see a cow skull. The treasure is underneath it.
- MUST HAVE NUEVO PARAISO UNLOCKED FOR THE FOLLOWING TREASURES
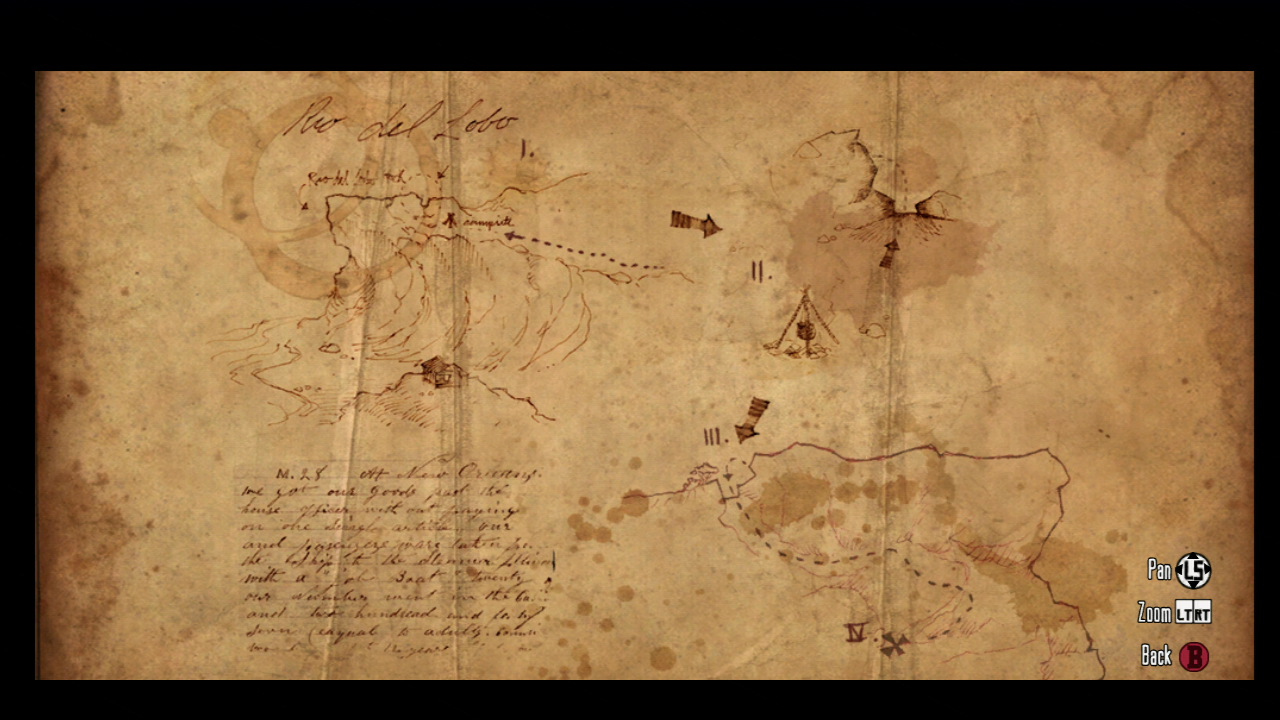
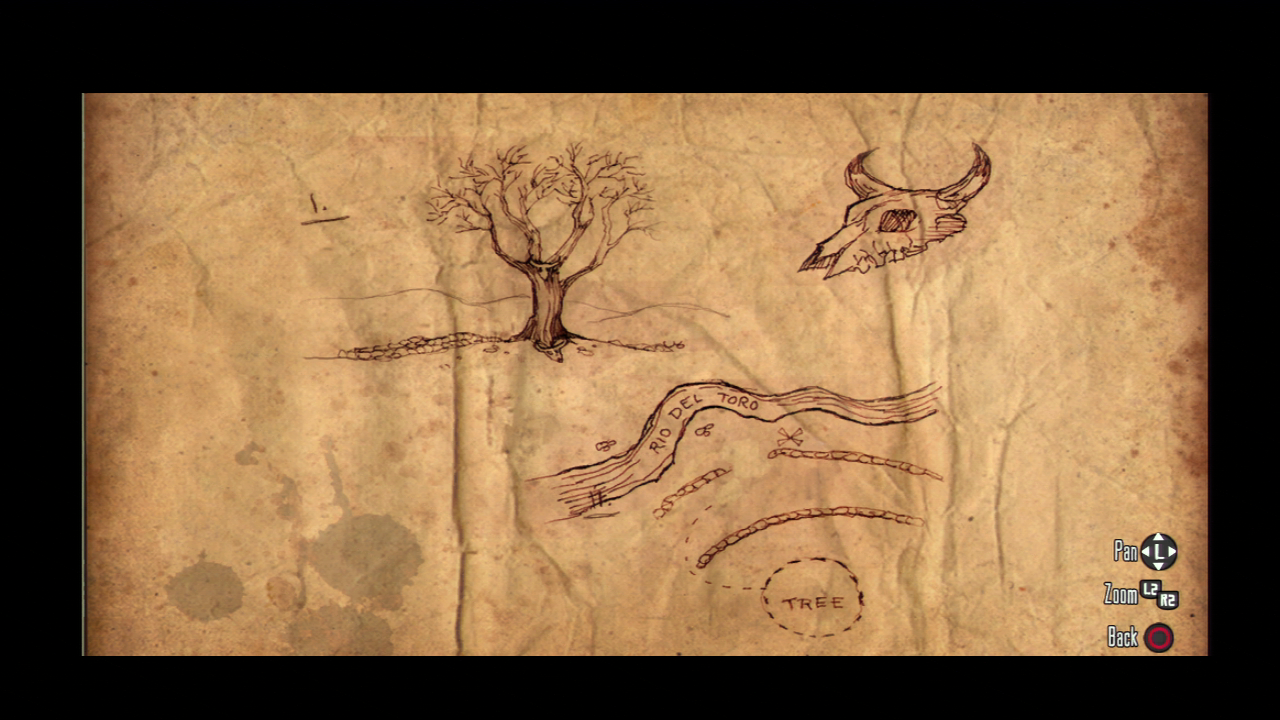
LEVEL 5
The forth treasure is found in Rio Del ToroMAP PICTURE
Look for the big tree with cattle skulls all around it. Follow the very simply directions from the map to a location just behind a short wall. The treasure is there.
LEVEL 6
The fifth treasure is found just South of your first Mexican safehouse. It's East of Escalara.MAP PICTURE
Climb the big rock formation you see in the map sketch. It's easy to determine which one it is because, the correct one has a treasure chest underneath it, not related to the treasure hunt.
LEVEL 7
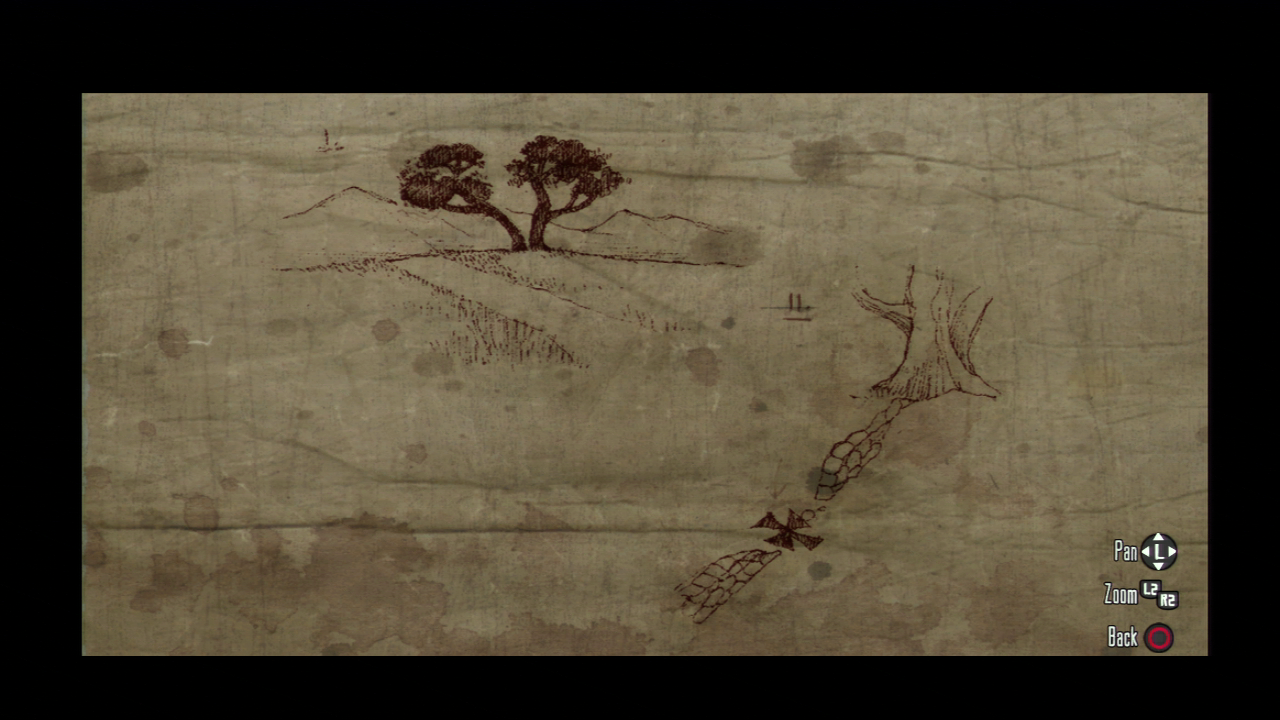
The sixth treasure is found in Ojo Del DiabloMAP PICTURE
This one is pretty easy as you'll see the familiar rock formation from the map miles and miles away. Simply climb up to the spot and it's hard to miss.
LEVEL 8
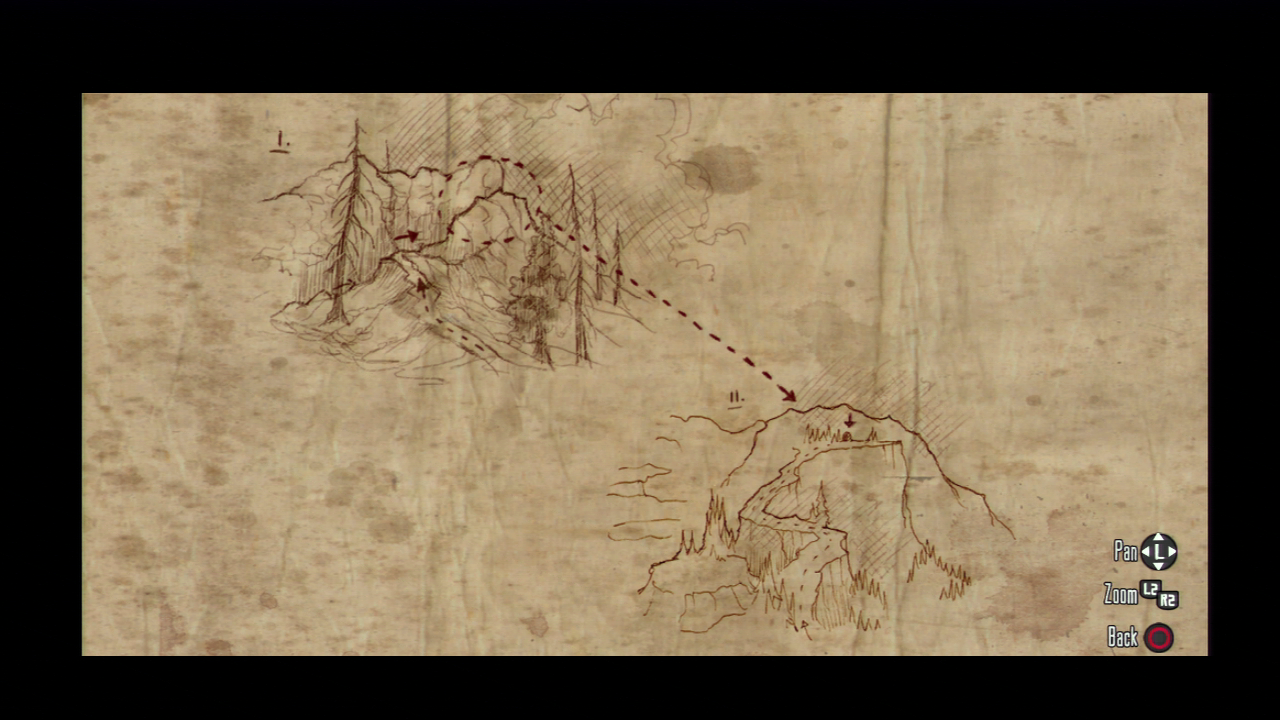
The seventh treasure is found north of Agave ViejoMAP PICTURE
You'll have to approach this one from the south because, this rock formation sits atop one of the tallest formations in Mexico and offers a really nice view. Approach from the West of Casa Madrugada, climbing up the hill and going pass Agave Viejo to the north. Once you spot the rock from the illustration on the map, follow the path from the map. You'll walk along a cliff facing the water until you reach the end. The treasure is at the end of the walk.
- MUST HAVE WEST ELIZABETH UNLOCKED FOR THE FOLLOWING TREASURES
LEVEL 9
The eighth treasure is found east of Beecher's HopeMAP PICTURE
Head to a little place on the map called, Broken Tree, just East of Beecher's Hope. The treasure is located alongside a broken down wall. You can't miss it.
LEVEL 10
The ninth and final treasure is found north of Manzanita Post, in Nekoti RockMAP PICTURE
A very simple treasure location finishes out the list. Ride up the winding path in Nekoti Rock and you'll see a cave at the end of the road. Enter the cave and you'll spot the treasure inside. Open it up to complete the Treasure Hunting Challenge.
- Once all 10 levels are done and you've collected all the treasures, you'll unlock the "Treasure Hunter's Satchel" which allows you to carry twice the amount of consumables. Plus all of the treasures you collected sell for a hefty price in most stores.
Congratulations! If you completed everything on this list, your one step closer to 100% completion. And if you finished this list then you also unlocked the "Legend of the West Outfit", which doubles the capacity of the dead-eye meter! So, give yourself a pat on the back!
Red Dead Redemption Guides
Other Guides