 © iRedDead & Simon 'Psy' Elliott 2008-2024. Powered by iGrandTheftAuto CMS v1.1 (Red Dead Edition April 2010). Privacy Policy
Gang Hideouts (Multiplayer)
Each of the single player hideouts in Red Dead Redemption are also available in Multiplayer too. Instead of a story to set the scene, as soon as you come within range you are prompted to start killing. Only two have objectives aside from killing waves of enemies. Although these hideouts are in multiplayer, they can be done easily alone depending on your skill and XP level. Having a friend (or seven) helps make things easier and faster.
All of these hideouts can be approached from multiple angles and/or use different strategies so this is simply to inform you of what lies ahead.
 The hideouts can be easily found from the Red Dead Redemption pause menu map. They are marked with an icon resembling a hat and bandana. View a full map of the original Red Dead Redemption hideout locations by clicking here.
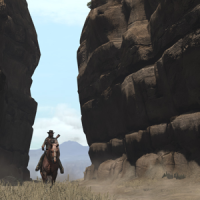 Objective: Blow up ammo supply stashes in the canyon.
Gang: The Bollard Twins Gang
Overview: There's three large weapon crates spread throughout the canyon. You can do them in any order, however, the game wants you to do the middle one first and will reset you there if you die doing the other two. All three areas have different land features so you may find an order that works for you. I prefer doing the Northeastern one first and then in order from there. You cannot use your own explosives to blow up the crates so don't waste your ammo. When next to the crate, you will be prompted to press triangle or Y which starts an animation of burying dynamite. You then have about 10 seconds to get away before the boom. This hideout will yield the most XP (you may notice people there all the time).
Prize: Evans Repeater
 Objective: Clear the outpost of gang members.
Gang: Walton's Gang
Overview: A simple kill-fest. You can approach this hideout from any angle but I think coming from the Eastern trail up on the rocky hillside is the best for cover and provides a good vantage point of the area.
Prize: Mauser Pistol
 Objective: Take over the fort by force as necessary.
Gang: The Bollard Twins Gang
Overview: The only way into the fort is the main entrance. But that doesn't mean you can't throw some goodness over the walls. The two major fighting grounds are the front square and rear of the fort.
Prize: LeMatt Revolver, Semi-auto Shotgun
 Objective: Help make the ghost town a safer place.
Gang: The Bollard Twins Gang
Overview: The area is split into three parts. The church and barn are both in the first part. You can start with either one. These are followed by the town and lastly the mansion where the head of the gang is living. Ammo crates are provided at each. For me, the best place to enter and start is at the church. As soon as you cross the bridge into Tumbleweed there is a path going up a hillside on your left which is a great vantage point for the church and also the barn later.
Prize: Bolt Action Rifle
 Objective: Get your grubby hands on some gold.
Gang: Treasure Hunters
Overview: There isn't really a "best" way to start, but coming in from the South, East, or North provide the best amounts of cover. East and North give good access to the riflemen hiding out above the entrance area but other enemies from the main building will be able to get you easier as they come out. I prefer coming up from the South, allowing me to advance to the entrance a little easier without too many longshots and hopping from cover to cover. You don't need to kill ALL of the miners throughout but why waste the XP?
Prize: Dynamite
Note: For the last part, if you don't kill the enemies running into the mine as you push the cart out, they will stay in there. If you die before activating the next wave along the tracks, you will respawn in the mine entrance with those enemies shooting at you. It makes for an unpleasant loop of death...
 Objective: Drain the life out of this tub of sin.
Gang: Banditos
Overview: You can enter from either end. The West end has one initial guard. The East end has two plus enemies on the roofs of four buildings, two of them in sight. There is also the hillside along the Eastern side but not much cover.
Prize: High Power Pistol
 Objective: Take out waves of enemies in the village.
Gang: Rebels
Overview: My favorite way to approach this hideout is from the East, and take full advantage of the rocks just outside the village. The formation makes great cover as you pick off whoever you can. However, with so many obstacles, you'll end up getting in the middle of it all by the end - literally.
Prize: Carcano Rifle
Gang: Walton's Gang
Overview: The two main ways to enter are from the North and South. Getting on top of the rock mountain at the Southwest corner doesn't seem possible and that may have draw backs anyway when it comes time to get the ones hiding in the barn. There's plenty of cover with rocks and the ruins after you flush out the enemies. They won't shoot you until you shoot them. Knives are a nice quiet way to take out the ones roaming around away from the main area.
Prize: Fire Bottles
Completion of each hideout gives the Explosive Rifle. However, it does not remain in your inventory if killed and will not get reloaded from ammo crates.
Warthington Ranch: Southwest of MacFarlane's Ranch.
Critchley's Ranch: Northwest of Mercer Station.
Venter's Place: Northwest corner of Lake Don Julio.
The Scratching Post: Southwest of Benedict Point at the river or West of Solomon's Folly.
Cueva Seca: On the Western edge of Gaptooth Ridge and New Austin.
Rancho Polvo: Southeast corner of Perdido.
Crooked Toes: Middle of Punta Orgullo near the river and bridge to the US.
All of these hideouts can be approached from multiple angles and/or use different strategies so this is simply to inform you of what lies ahead.
The hideouts can be easily found from the Red Dead Redemption pause menu map. They are marked with an icon resembling a hat and bandana. View a full map of the original Red Dead Redemption hideout locations by clicking here.
Pike's Basin
Objective: Blow up ammo supply stashes in the canyon.
Gang: The Bollard Twins Gang
Overview: There's three large weapon crates spread throughout the canyon. You can do them in any order, however, the game wants you to do the middle one first and will reset you there if you die doing the other two. All three areas have different land features so you may find an order that works for you. I prefer doing the Northeastern one first and then in order from there. You cannot use your own explosives to blow up the crates so don't waste your ammo. When next to the crate, you will be prompted to press triangle or Y which starts an animation of burying dynamite. You then have about 10 seconds to get away before the boom. This hideout will yield the most XP (you may notice people there all the time).
Prize: Evans Repeater
Cornered
The Northeastern crate will have an initial group of enemies guarding it and a second wave running in after the fuse it lit so be ready. There are some rocks to hide behind at the Eastern entrance for the initial attack. Be aware of a few enemies up around the canyon's rim as part of the backup. I like to hide on the hill at the Southwestern part since that's pretty much your nearest and only cover.O.K. Corral
The easiest one is in the middle with the cattle. Kill all the enemies around and then blow it up. Easy enough, right? Of course it is! You can actually stand at the top of the entranceway (Southside of canyon wall where the road is) and most if not all the enemies will run up to you for easy pickings.Best for Last
The Western-most crate is like the first. As usual you will be faced with enemies prior to the big boom. Kill them. After lighting the fuse, a couple more elevated enemies will appear as well as a final rush of angry people running in towards you with some delay. Being up high can be an advantage especially if you run towards the last round of red blips as the enemies will shoot at you but keep on running towards the remains of the crate. Kill these last ones to complete the hideout.Twin Rocks
Objective: Clear the outpost of gang members.
Gang: Walton's Gang
Overview: A simple kill-fest. You can approach this hideout from any angle but I think coming from the Eastern trail up on the rocky hillside is the best for cover and provides a good vantage point of the area.
Prize: Mauser Pistol
Peek-a-Die
The two guys up on the rocks are the easiest to start with and the most likely to take you out first. Once the shooting begins, others will start running toward you with weapons in hand. The rest will hide behind cover awaiting you to headshot them.Liberator
After the first wave is dead, more will run out from the larger building. If you have a view of the door, they can be easily taken out as they exit.Backup Arrives
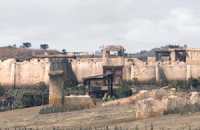
After the second wave is dead, a few more will appear around the area running in. Take them out to complete the hideout.Fort Mercer
Objective: Take over the fort by force as necessary.
Gang: The Bollard Twins Gang
Overview: The only way into the fort is the main entrance. But that doesn't mean you can't throw some goodness over the walls. The two major fighting grounds are the front square and rear of the fort.
Prize: LeMatt Revolver, Semi-auto Shotgun
Strolling In
As soon as you get near the entrance, a few enemies will rain down bullets from on top of the walls. Easy pickings. There will be some in the courtyard taking cover and more up the stairs on the right as you enter. Your main target should be the gatling gun directly ahead on top of the center building. You will have to pick off a few gunners as replacements cycle in.S'more
When you get well inside, a couple enemies will appear in the room on your left. You can run inside via a door in the far left corner and take two out with a shotgun if you're quick. If one escapes, he'll hide outside the window. More enemies will appear up high across the way and up near the gatling gun. Some stay inside the second floor rooms or below so flush them out.Mouth to Burro
After you clear out the entrance area, the rest are in the rear of the fort. You can head back there at ground level or stroll across the rooftops. The second gives you a good vantage point and cover. Once they're all dead you complete the hideout.Tumbleweed
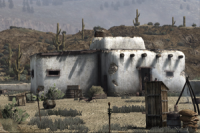
Objective: Help make the ghost town a safer place.
Gang: The Bollard Twins Gang
Overview: The area is split into three parts. The church and barn are both in the first part. You can start with either one. These are followed by the town and lastly the mansion where the head of the gang is living. Ammo crates are provided at each. For me, the best place to enter and start is at the church. As soon as you cross the bridge into Tumbleweed there is a path going up a hillside on your left which is a great vantage point for the church and also the barn later.
Prize: Bolt Action Rifle
The Church
Enemies are all around the church. When the shooting begins, some will run at you while the others take cover. There are plenty of enemies running out and around. In the middle of the blood-fest, two enemies will come from the barn if you are doing the church first. They may stay low or come up on the hill. When the dust settles there may be a few left inside the church. Finish the job however you wish. One may sneak out the side door while the rest go out the front. I choose dynamite for these last few.The Barn
Again, the hillside makes for a good vantage point. Running across from the church, you can snipe most if not all the enemies, if equipped. Most stay inside the barn. There will be about 5 of them unless you are doing the barn first. In that case, there will be about 7 and also a bunch of enemies running over from the church too.The Town
After the church and barn, you are off to the center of town. There will be one enemy on a rooftop next to the blue building at the Southside of the square. A few will be around the square taking cover. A couple will be on the balcony of the blue building with plenty running out from inside to take the place of the ones you just blew away. The saloon on the Northside of the square holds a few too. All may run out but usually two or three remain upstairs. I like to throw some dynamite into the second floor which usually works fine.The Mansion
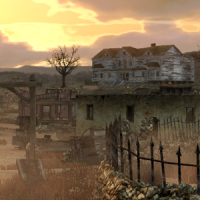
After painting the town red, make your way towards the mansion. If you have a sniper you can pick off the initial group exiting the mansion while at the edge of town. Once you are close, the rest will stay inside including the boss. I have had great results using dynamite through the second floor windows to kill most of the enemies who are hiding out upstairs. Then I toss fire bottles through the front doors into the main room. There are some enemies in the basement who might come up through the house or a couple may use the outside stairs on the left side of the mansion. Once they are all dead and the ghost population increases, the hideout is complete.Gaptooth Breach
Objective: Get your grubby hands on some gold.
Gang: Treasure Hunters
Overview: There isn't really a "best" way to start, but coming in from the South, East, or North provide the best amounts of cover. East and North give good access to the riflemen hiding out above the entrance area but other enemies from the main building will be able to get you easier as they come out. I prefer coming up from the South, allowing me to advance to the entrance a little easier without too many longshots and hopping from cover to cover. You don't need to kill ALL of the miners throughout but why waste the XP?
Prize: Dynamite
Going Mining
There will be enemies all around the camp as well as those few up high. Take them all out and get to the mine entrance. You may need to go up the stairs or hill to get the last one hiding behind the main building.Taking the Prize
Make your way down into the mine, killing enemies along the way. Lanterns and dynamite crates can be useful depending on where the enemies stand or run to as you advance. A minecart will be waiting in the main room. Clear all the tunnels for the XP and start pushing the cart out.Fight to the End
As you near the exit, enemies will appear on your radar/minimap. If you've got the balls, keep pushing the cart out of the mine, shoot the few running at you as you go, and keep pushing around the track. There will be a large amount of enemies inside the big building on your right as you pass but you can get away with a scratch. As you come through the tents to the last bend before the incline, a wave of enemies will run out from the next building over the tracks. At this point you should find the nearest crate to hide behind because there will now be a large group running towards you. Dead-Eye is quite useful to target a bunch at once. Clean out both buildings and start pushing the cart up the hill. When you near the top, a couple more enemies need to be disposed of. Then push the cart to the end of the line to complete the hideout. On your left will be a stagecoach for the taking. You can't drive it prior to completing the hideout.Note: For the last part, if you don't kill the enemies running into the mine as you push the cart out, they will stay in there. If you die before activating the next wave along the tracks, you will respawn in the mine entrance with those enemies shooting at you. It makes for an unpleasant loop of death...
Tesoro Azul
Objective: Drain the life out of this tub of sin.
Gang: Banditos
Overview: You can enter from either end. The West end has one initial guard. The East end has two plus enemies on the roofs of four buildings, two of them in sight. There is also the hillside along the Eastern side but not much cover.
Prize: High Power Pistol
Breaking In
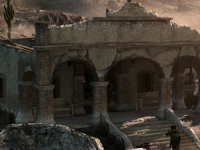
However you start the attack, get in and kill all the enemies inside. There are plenty of hiding places and they roam around inside the little village. You can essentially stand at the doorway and pick off all of them as they peek out or run between cover. The building you want is the large one with columns at the East end (in the picture). Inside is a ladder in the back left to get to the roof. If you didn't kill the guy up top already, do so on your way inside through the missing planks. This is where you can pick up the High Power Pistol.Fire and Knives
When the last of the intial wave is dead, more will come from around the area. Fire bottles will rain down at you from horseback. Try to kill that guy first to save some aggravation. Pick off other enemies as they enter the village. There are still others running around the outside walls with throwing knives. For some reason they seem to have the best aim ever - 64 yards is child's play.Knives and Fire
If the second wave wasn't annoying enough, you get some more. Again, watch out for incoming fire bottles.Four Course Meal
And yet another wave of the same. After they're all dead you complete the hideout. Some women will probably be left. Free XP with no bounties on your head for killing them FYI.Nosalida
Objective: Take out waves of enemies in the village.
Gang: Rebels
Overview: My favorite way to approach this hideout is from the East, and take full advantage of the rocks just outside the village. The formation makes great cover as you pick off whoever you can. However, with so many obstacles, you'll end up getting in the middle of it all by the end - literally.
Prize: Carcano Rifle
Welcoming Committee
There is a very large group of enemies when you approach. Take out whoever you can from behind the rocks and then sweep through the village. All the market stands and buildings provide obstacles but also cover.Send in the Dogs
After the last person is on the ground, more enemies will appear from all sides including two attack dogs. The best place to be is inside one of the little buildings. Not only will you have good cover but also the dogs won't enter. Pick them off (don't worry, they all go to heaven) and anyone else you can from the windows. If you can't get a good angle, you'll have to run outside to get the last few.One More Time
Once that wave is done, guess what? That's right! You get another! After this wave is flattened the hideout is complete.Solomon's Folly (PS3 and GOTY Edition Only)
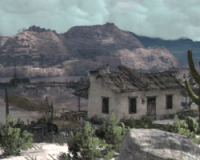
Objective: Clear the barn and ruins of enemies.Gang: Walton's Gang
Overview: The two main ways to enter are from the North and South. Getting on top of the rock mountain at the Southwest corner doesn't seem possible and that may have draw backs anyway when it comes time to get the ones hiding in the barn. There's plenty of cover with rocks and the ruins after you flush out the enemies. They won't shoot you until you shoot them. Knives are a nice quiet way to take out the ones roaming around away from the main area.
Prize: Fire Bottles
Oh Hey There
There is a large initial group of enemies, most of whom are in and around the barn. If you stick around for a little bit before starting the show, a bunch will gather next to the barn making a prime opportunity for dynamite. Once you start shooting, it's on - unless you are using a glitch. Kill all of them.Where You Live
For the next wave, in addition to more enemies running into the area there are a few coming up from the basement at the entrance to the area. If you manage to kill all of them quickly you'll get the "Basement Cleaner" bonus which can be tricky to achieve.I C U Die
The last wave has more enemies running in from around the area as well as two snipers up on the mountain. I recommend taking out the snipers as early as possible. They can rain down hell while you are duking it out with someone at ground level. Kill every last one to complete the hideout.Liars and Cheats Pack DLC Hideouts
The Liars and Cheats Pack downloadable content added additional hideouts to complete. If you don't own the pack, the icons appear faded on your map. These are all kill-fests so rack up some good combos!Completion of each hideout gives the Explosive Rifle. However, it does not remain in your inventory if killed and will not get reloaded from ammo crates.
Warthington Ranch: Southwest of MacFarlane's Ranch.
Critchley's Ranch: Northwest of Mercer Station.
Venter's Place: Northwest corner of Lake Don Julio.
The Scratching Post: Southwest of Benedict Point at the river or West of Solomon's Folly.
Cueva Seca: On the Western edge of Gaptooth Ridge and New Austin.
Rancho Polvo: Southeast corner of Perdido.
Crooked Toes: Middle of Punta Orgullo near the river and bridge to the US.
Red Dead Redemption Guides
Other Guides